
How to Finish and Polish Resin Art for a Smooth, Glossy Surface
Polishing harder can work against the glossy finish you want: friction creates heat, which can soften resin. Cured resin can be sanded, and finishing and polishing resin art usually involves moving through progressively finer grits before buffing. Let the surface guide your pace instead of pressing harder.
It makes sense to want to smooth scratches and restore a clear, reflective surface without damaging your piece. This guide explains when resin is ready for sanding, how to move from coarser to finer grits, and how Tripoli and White Diamond compounds can help create shine. You’ll also learn how wet sanding helps keep the surface cooler and more even, and why a polishing tool should stay in motion. A steady, step-by-step approach helps you choose a finish suited to the shape and condition of your resin art.
Table of Contents
Buffing with Tripoli and White Diamond compounds
For finishing and polishing resin art, choose compounds in stages: Tripoli for medium rubbing, followed by White Diamond for a finer polish. Gather both compounds, a soft cloth or foam pad, and a clean pad for each stage. Buff only after sanding has refined the surface to 2000 grit. Polishing compounds refine the prepared surface; they won’t reliably remove deep scratches left by coarse sanding.
Wipe away sanding residue, then inspect the resin for remaining scratches. If deeper marks are visible, return to sanding rather than asking a compound to remove them.
Apply a small amount of Tripoli to a foam pad or soft cloth. Work a small area with steady, even passes, letting the medium compound reduce fine sanding marks.
For machine buffing, use a motor rotating at around 1500-2000 rpm. Keep the pad level and moving across the resin; don’t hold it over an edge or one blemish.
Remove Tripoli residue with a clean, soft cloth before applying White Diamond. Use a separate pad or cloth so particles from the rubbing compound don’t carry into the finer polishing stage.
Buff with White Diamond until the surface has an even sheen, then wipe away residue. On small pieces, hand polishing with a soft cloth and fine compound can restore clarity and shine.
Finishing and polishing resin art can include wax, but use it only after polishing compounds create the shine you want. Apply a small amount of finishing wax with a clean cloth and buff gently. Wax is a final surface treatment, not a substitute for removing scratches with Tripoli and White Diamond.
Foam pads work well with compounds and high-gloss resin finishes. Wool pads cut more aggressively, making them suitable for initial polishing or heavily scratched surfaces.
After polishing, the author says the epoxy went from dull to glassy in a few minutes.
Can You Sand Resin?
Yes, cured epoxy resin can be sanded to remove surface marks. Wet sanding helps control heat and dust. It can smooth surface imperfections, but it won’t remove bubbles trapped inside the resin.
Choose Sanding or a Fresh Resin Coat
Choose sanding for shaped or curved pieces, or when the artwork cannot take another coat. For a flat surface with light scratches, sand evenly and apply a fresh coat. A flood coat can fill light sanding marks and level into a glossy finish. Don’t use a new coat to hide deep defects or bubbles within the resin.
Clean Between Sanding Grits
Wipe or rinse away residue before changing grits. Leftover coarse particles can scratch the surface during a finer pass, so clean the piece and sanding abrasive, then inspect under good light. For example, after a 400-grit pass, remove the slurry before moving to 800 grit.
Let resin harden before sanding. Allow at least 24 hours, ideally 48 hours, before sanding; epoxy should reach a hard cure for at least 24 hours before polishing. Cure time varies by formula, and epoxy generally needs 5 to 7 days to fully cure before varnish or urethane.
Start with dry sanding for initial shaping, then switch to wet sanding as you refine the finish. Wet sanding with water helps keep the surface cool, flushes away debris, and supports a more even scratch pattern.
Spray water over the area and sand in a circular motion. Keep the abrasive and surface clean as you work; this also helps prevent sandpaper clogging and reduces dust.
For sanding safety, use wet sanding to help limit dust and keep sanding residue from spreading across the workspace. Wash the finished surface with mild soap and water before varnish or urethane, dry it, then remove sanding residue.
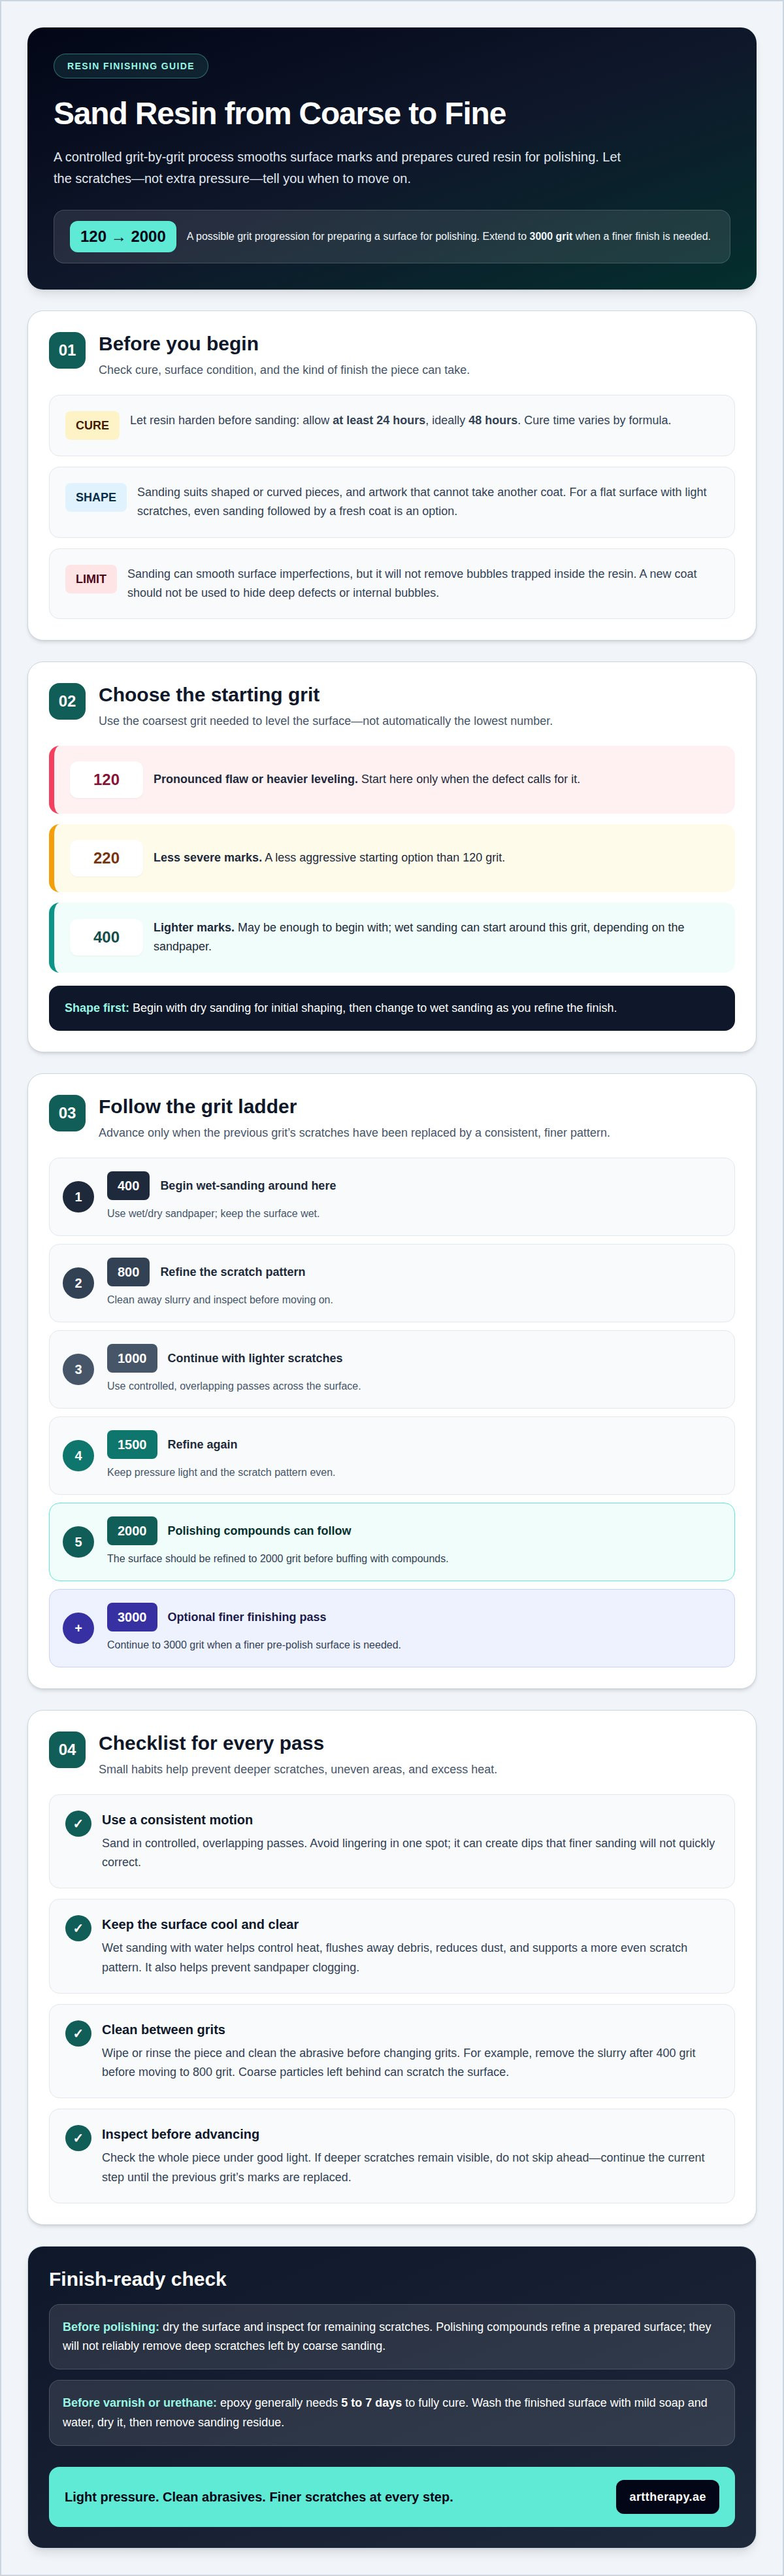
Progressive sanding from coarse to fine grits
Sand resin art step by step, moving to finer sandpaper only after each pass removes the previous scratches. A 120-to-2000-grit progression can prepare the surface for polishing; extend to 3000 grit when a finer finish is needed.
Begin with Coarse Sandpaper Grits
Start with the coarsest grit needed to level the surface, not automatically the lowest number. For a pronounced flaw, begin at 120 grit; for lighter marks, 220 or 400 grit may be enough. Sand evenly, then inspect the whole piece before moving on. Avoid lingering in one spot, which can create dips that finer sanding won’t quickly correct.
Move Through Finer Wet-Sanding Grits
Switch to wet sanding around 400 grit, depending on the sandpaper. A useful progression is 400, 800, 1000, 1500, and 2000 grit, with 3000 grit as an additional finishing pass. Keep the surface wet, use light pressure, and clean away slurry between grits. Don’t skip a step if deeper scratches remain visible.
Choose a starting grit by matching it to the defect: 120 grit for heavier leveling, or 220 and 400 grit for less severe marks.
Sand in controlled, overlapping passes. Use the same motion across the surface so one section doesn’t become more deeply abraded.
At each grit, continue until the previous grit’s scratches are replaced by a consistent, finer pattern. Inspect the resin under good light before advancing.
Clean the surface and abrasive between grits. A stray coarse particle can leave scratches that stand out after polishing.
From about 400 grit, wet-sand with wet/dry sandpaper. Water carries away debris, helps prevent clogging, and supports a more even finish.
Progress through 800, 1000, 1500, and 2000 grit. For a finer pre-polish surface, continue to 3000 grit; then dry and inspect for remaining scratches.
Preventing heat buildup during polishing
Friction can heat epoxy resin and soften its surface, leaving haze or uneven marks. When machine polishing, keep the tool moving and use light pressure rather than forcing the shine.
Set up with a clean polishing pad and a small amount of compound. A buffing motor rotating at around 1500-2000 rpm is suitable for resin; avoid increasing pressure to compensate for a surface that still shows sanding scratches.
Work across a small section at a time, guiding the pad continuously over the resin. Don’t hold it stationary on an edge or a blemish, where concentrated friction can warm and soften the material.
Use light, even pressure. Let the pad and compound do the refining; pressing harder adds friction without replacing the need for a properly prepared surface.
Pause regularly and feel the resin near the area being polished. If it feels warm, stop and let the piece cool before continuing. This simple check helps you notice heat before the finish becomes visibly affected.
Choose a foam pad for applying polishing compounds and refining the finish. Wool pads cut more aggressively, so reserve them for initial polishing or heavily scratched surfaces, and keep them moving with care.
For a small resin artwork, consider hand polishing with a soft cloth and fine compound. Hand work gives you close control over pressure and movement, reducing the chance of concentrating machine friction in one spot.
Inspect the surface under good light between passes. If the gloss remains uneven, check for sanding marks or residue instead of adding pressure; polishing won’t correct scratches that need further sanding.
Learning to read the surface, manage pressure, and pause when resin warms makes the polishing process more controlled. For a shared creative experience, plan a creative team session and explore resin art together.
Art Therapy: Resin Art Workshop
Art Therapy’s Resin Art Workshop offers a welcoming next step if you’d like to explore resin art through hands-on making. The sanding and polishing process can teach you to notice how each choice changes a surface; creating a piece from the beginning offers another way to learn the material and enjoy its possibilities. If you’re drawn to a different medium, Art Therapy also offers Acrylic Painting, Oil Painting, and 3D Texture Art Workshops. Choose the creative process that feels right for you, whether you want to continue with resin or explore another form of expression. For those who would enjoy learning in a guided workshop setting, Art Therapy’s Resin Art Workshop is a natural place to begin. Contact Art Therapy to ask about taking part.
Let Your Next Piece Take Shape
A thoughtful approach to finishing and polishing resin art can shape how you plan your next piece. Consider the finish you want from the start, then make choices that support it, from the artwork’s shape to how you’ll refine the surface. Finishing can be part of the creative process, not just the last task before displaying your work.
If you’d like to keep exploring with guidance, Art Therapy offers a Resin Art Workshop, alongside Acrylic Painting and Oil Painting Workshops. Each offers a different material and way to express an idea, whether you’re drawn to resin’s layered look or the feel of paint on a surface. Choose the next step that suits your curiosity, and give yourself space to learn through making.
Contact Art Therapy to explore a workshop that feels right for your next creative step. Let your next idea begin with a little room to experiment.
Frequently Asked Questions
How do I fix dull epoxy resin?
First, clean the cured surface with mild soap and water, dry it, and inspect it under good light. If fine surface scratches are causing the dullness, refine the sanding marks and polish again. A flat piece with widespread surface wear may benefit from sanding followed by a fresh coat. If the cloudiness is beneath the surface, polishing the top won’t remove it.
What grit sandpaper should you use for finishing epoxy resin?
Choose the starting grit according to the marks: a coarser grit such as 120 can level pronounced flaws, while 220 or 400 may suit lighter scratches. Then progress through finer grits, for example 800, 1000, 1500, and 2000. A final pass at 3000 can further refine the surface before polishing. Don’t move on while scratches from the previous grit remain visible.
Should you use a resin topcoat or sand and polish the surface?
Choose based on the piece’s shape and condition. For a flat surface that needs renewed gloss, sanding and applying a fresh resin coat can create an even finish. Sanding and polishing is better suited to curved or shaped pieces, or artwork that cannot take another coat. A topcoat won’t correct defects trapped inside the resin, so distinguish surface wear from internal imperfections first.
Why does resin turn cloudy or develop swirl marks during polishing, and how can you fix it?
Cloudiness or swirls can come from visible sanding scratches, compound residue, or friction concentrated in one area. Stop polishing, let the resin cool, and wipe the surface clean before inspecting it in good light. If scratches remain, return to a grit that can remove them, then work through finer abrasives. Keep the polishing pad moving and use light, even pressure.



Comments