
Fluid Art Mistakes to Avoid for Better Colour and Cells
The most important fluid art mistakes to avoid are rushing the process, using too many competing colours and sealing a painting before it has fully dried. For acrylic pours, allow the painting to dry for 3-4 weeks before varnishing. A small, harmonious palette and a test of your paint mix can also help you see how colours will flow and whether cells are likely to form.
It’s natural to want to keep adjusting a pour when the colours or cells aren’t forming as you imagined. But too much movement can muddy the colours, while patience gives the paint room to settle. This guide covers practical ways to choose colours, test paint consistency and cell formation, and let a finished painting dry before sealing it, so you can approach each pour with more confidence.
Table of Contents
1. Allowing paintings to dry and cure before sealing
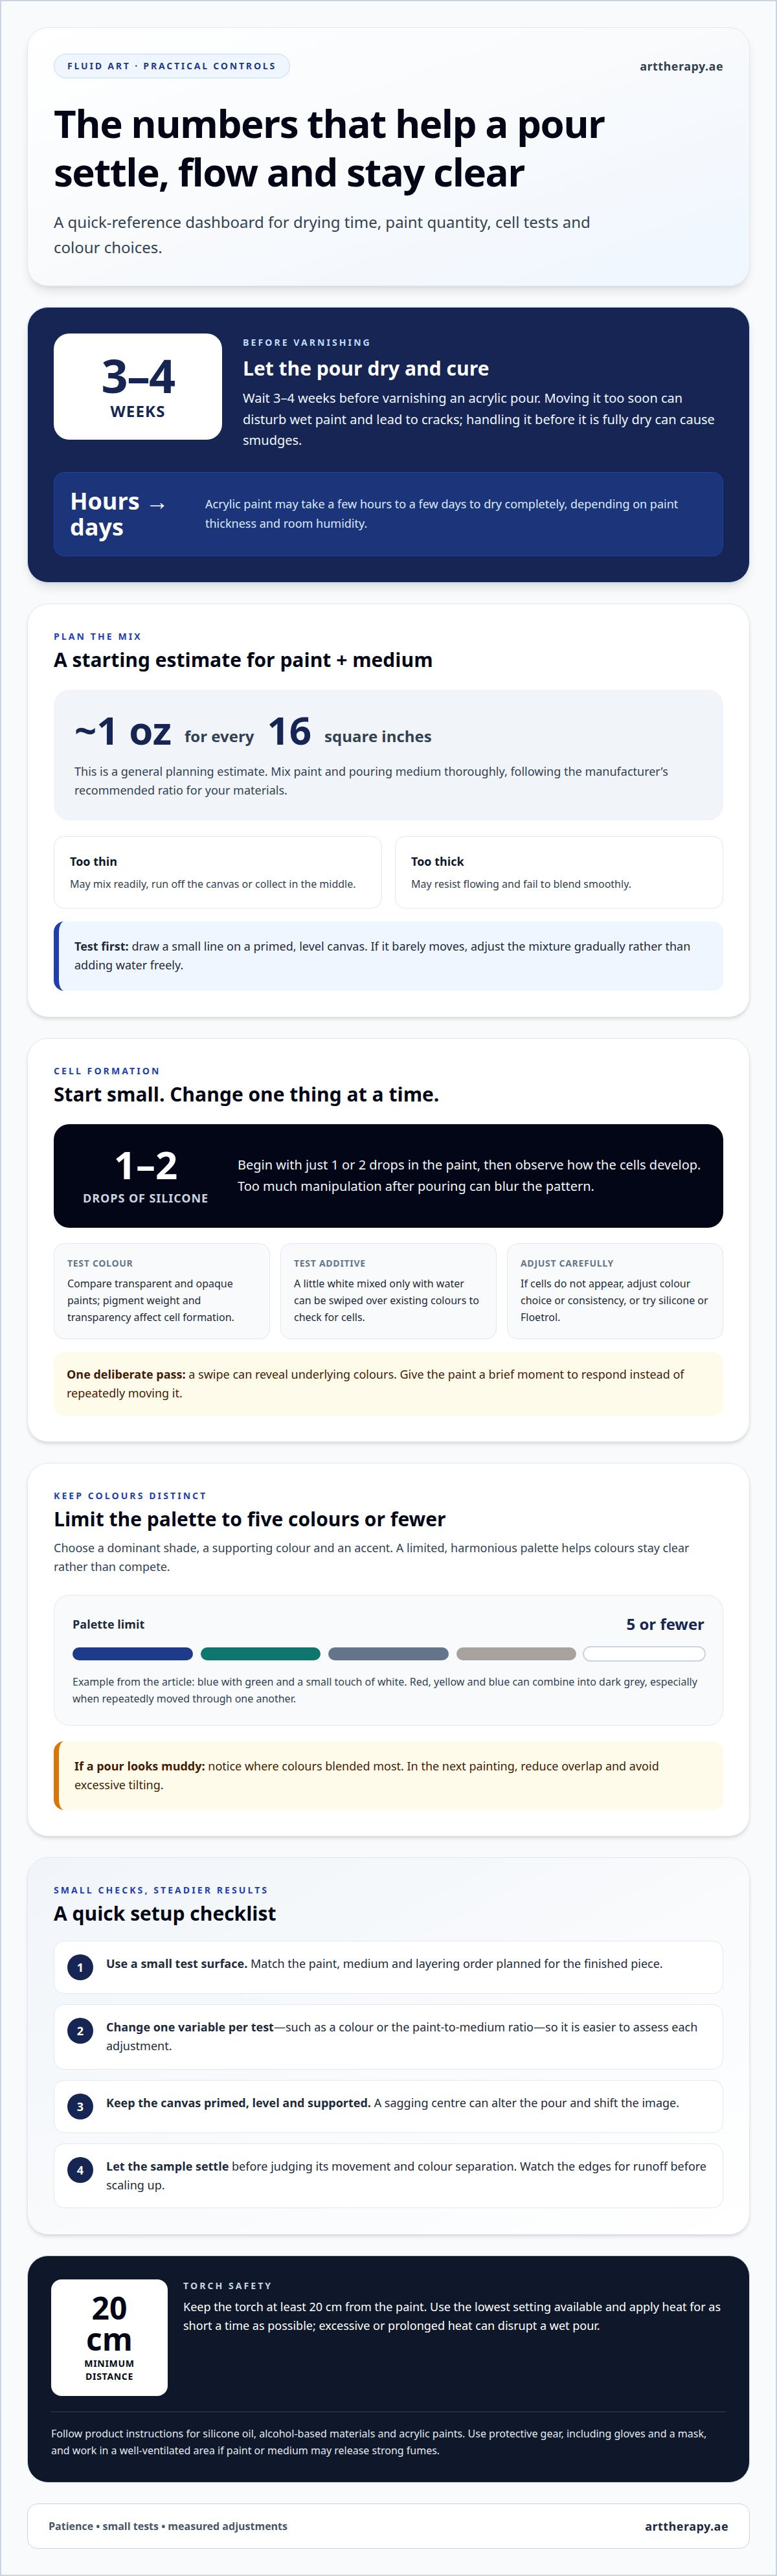
Acrylic paint may take a few hours to a few days to dry completely, depending on paint thickness and room humidity. Before varnishing, allow an acrylic pour painting to dry for 3-4 weeks. Drying and curing take patience: moving the painting too soon can disturb wet paint and lead to cracks, while handling it before it’s fully dry can cause smudges.
Start with a stable, level surface so the pour doesn’t collect at the bottom or run off an edge. Mix acrylic paint and pouring medium thoroughly, following the manufacturer’s recommended ratio for your materials. As a general planning estimate, a paint-and-medium mixture may require about 1 ounce for every 16 square inches of surface. A consistent mix helps the paint flow and spread evenly.
To keep dust from settling, place the painting in a clean, still area and use a cover raised above the wet surface. A clean box can work if it doesn’t touch the paint and allows airflow. Avoid moving the painting as it dries: vibrations or tilting can shift the pour and disturb its surface.
A torch isn’t risk-free. Treat it as a heat source: keep it at least 20 cm from the paint, use the lowest setting available, and apply heat for as short a time as possible. Excessive or prolonged heat can disrupt a wet pour, so don’t linger over one spot.
Seal the painting only after it has dried and cured. Dispose of leftover acrylic paint and pouring medium according to the manufacturer’s instructions and local guidelines, rather than washing excess into drains. If a dried pour isn’t suited to display, cut out an intact section to make a greeting card. This gives an imperfect experiment a thoughtful second life.
2. Creating cells with additives and colour choices
Cells form through interactions between additives and the transparency and weight of acrylic colours. Titanium white is a dense pigment that sinks quickly, which can help create cells and lacing. For a controlled test, swipe a little white paint mixed only with water across your existing colours. If cells don’t appear, adjust the colour choice or paint consistency, or try an additive such as silicone or Floetrol.
Use restraint with additives. Start with just 1 or 2 drops of silicone in the paint, then observe how the cells develop. Too much manipulation after pouring can blur the pattern before it settles. A swipe can reveal underlying colours, so make one deliberate pass and give the paint a brief moment to respond.
Muted or muddy colour often starts with combinations that mix into dull tones. Red, yellow and blue together can create dark grey, especially when repeatedly moved around on the surface. Limit your palette to five colours or fewer, and choose shades that work well together. If a pour looks muddy, notice where the colours blended most. In your next painting, reduce overlap and avoid excessive tilting.
Test colour choices and additives on a small surface before attempting a larger pour. Compare transparent and opaque acrylic paints, since pigment weight and transparency affect cell formation. Change one factor at a time, such as replacing a colour or adjusting consistency. This makes it easier to identify what helped, rather than changing several variables at once.
For silicone oil, alcohol-based materials and acrylic paints, follow each product’s instructions and use protective gear, including gloves and a mask. Work in a well-ventilated area if paint or medium may release strong fumes. Wash uncertain paint or medium from skin with soap and water; if it enters your eyes, rinse thoroughly and seek medical attention if needed. For supported, guided colour exploration can help you practise observing these changes.
3. Testing colour combinations and consistency on small canvases
A small test canvas helps beginners see how colours interact before they use a larger surface. Make a sample with the same acrylic paint, medium and layering order planned for the finished piece. Notice whether colours stay distinct, blend into dull patches or spread farther than expected. Change one variable per test, such as a colour or the paint-to-medium ratio. That makes each adjustment easier to assess.
Consistency determines how acrylic pouring paint moves. Paint that’s too thin can mix readily with other colours, run off the canvas or collect in the middle. Paint that’s too thick may resist flowing and fail to blend smoothly. Start with the manufacturer’s recommended ratio, mix the paint and medium thoroughly, then test a small line on your canvas. If it barely moves, adjust the mixture gradually rather than adding water freely.
Prime the canvas before pouring. A primed surface can help paint move more evenly, while an unprepared surface may absorb it unevenly. Check that the canvas is level and supported: a sagging centre can alter the pour and shift the image. If the canvas flexes under gentle pressure, support it from beneath before adding paint.
To reduce paint runoff and waste, test the mixture on a small surface, keep the canvas level and pour controlled amounts. Very liquid paint can still slip, so watch the edges during the test and adjust the consistency before scaling up. Let the sample settle before deciding whether its movement and colour separation suit your plan. A small test can show whether the next pour needs a thicker mix, less movement or different surface preparation.
4. Choosing a limited, harmonious colour palette
A palette works best when its colours complement one another instead of competing for attention. Before pouring, choose a dominant shade, a supporting colour and an accent. For example, blue with green and a small touch of white creates a different effect from combining unrelated bright shades. Keep the selection to five colours or fewer, so the painting has contrast without looking crowded. One of the fluid art mistakes to avoid is choosing every appealing shade without considering how the colours will meet.
Consider what happens when colours meet. Red, yellow and blue can combine into dark grey, especially if they’re repeatedly moved through one another. That muddy mixture can spread across the painting as you tilt or swipe. Arrange your chosen colours beside one another on a test surface, then see which combinations stay distinct when slightly blended. A small test can show whether the palette remains harmonious after pouring.
Colour harmony also depends on how the paint behaves. Different pigments vary in transparency and weight, affecting how they layer and form cells. Keep the mixtures similar enough in consistency for the colours to flow together, and test adjustments separately. Mix acrylic paint and pouring medium thoroughly. If a paint feels too thin, use more paint and less water to thicken it; Floetrol is another option. PVA can also thicken paint, but it isn’t archival.
Don’t try to rescue a busy palette by mixing every colour completely on the canvas. Each extra pass can blur boundaries and mute bright shades. Another fluid art mistake to avoid is adding more movement when colour separation is already fading. Simplify the next pour instead: remove one colour, keep a clear dominant shade and move the canvas deliberately to preserve separation. Changing one choice at a time makes the result easier to assess and repeat.
For hands-on practice with colour relationships and controlled mark-making, explore the Palette Knife Painting Workshop. It offers a way to notice how each colour behaves before deciding how it belongs in a fluid pour.
Art Therapy: Fluid Art Workshop
Art Therapy’s Fluid Art Workshop is a natural next step if you’d like to explore pouring, colour choices and cell formation through hands-on practice. It gives you space to experiment with how paint moves, how colours meet, and how small adjustments can shape a finished piece. You can bring the ideas from this guide into the creative process, learning by observing each pour rather than expecting every result to look identical.
If you’re drawn to a different way of working, Art Therapy also offers Acrylic Painting, Oil Painting and 3D Texture Art workshops. Each offers another path for exploring materials and mark-making, without needing to make one technique suit every idea.
Contact Art Therapy to ask about joining a Fluid Art Workshop.
Let Your Next Pour Begin With Curiosity
Let each painting be a chance to notice what you enjoy, not just a test of whether the result matches your plan. The fluid art mistakes to avoid can become useful cues: pause, observe how the materials respond and make one thoughtful adjustment next time. That approach turns experimentation into a practice you can carry into every creative project.
If you’d like to explore another material or way of creating, Art Therapy also offers Resin Art, Acrylic Painting and Oil Painting workshops in Dubai. Designed for people without drawing experience, each offers a different way to work with colour, texture and movement while focusing on the process.
When you’re ready to explore your next idea, contact Art Therapy to discuss your art. Bring your curiosity, give yourself room to experiment, and let the next pour take shape one considered choice at a time.
Frequently Asked Questions
What are the most common fluid art mistakes beginners make?
Beginners often change too many parts of a pour at once, making it hard to learn what caused the result. For example, changing the palette, paint consistency and pouring method together gives no clear clue about which change helped. Try a simple dirty pour or flip cup, and note one adjustment after each attempt. That turns an unexpected result into useful information for your next painting.
How do you mix acrylic paint and pouring medium at the right ratio?
Use the paint and pouring medium manufacturer’s recommended ratio as your starting point, since products behave differently. Stir thoroughly, then test a small amount on a spare surface. If the mixture resists flowing, adjust it gradually and test again; if it runs too freely, avoid adding more water. Record the proportions that work with your materials so you can recreate the consistency.
How can you prevent muddy colors in fluid art?
Don’t let colours blend into one another for too long. For example, if a swipe starts turning bright blue and yellow into dull green, stop moving the paint and let the pattern settle. Choose shades that remain distinct when they touch, and use a small test pour to see how they interact. If your palette looks muddy, simplify your next attempt instead of adding more colours.
How do you avoid pinholes, bubbles, and cracking in acrylic pours?
After vigorously shaking paint, let it rest for a few minutes after mixing to help prevent pinholes. Mix steadily rather than introducing unnecessary air, and avoid moving the painting before it’s dry enough, since wet paint can shift and crack. Adding another layer over a fluid acrylic painting may also cause cracking. Keep the process deliberate, and change one part at a time when troubleshooting surface flaws.
What causes cells not to form in fluid art, and how can you fix it?
Cells may not appear if the paint colours, transparency, pigment weight or additives aren’t interacting as needed. Try swiping a little white paint mixed only with water across the existing colours. If cells still don’t show, adjust the colour selection or consistency, then test again. Changing one variable at a time helps reveal which adjustment affects the pattern.
How do you prepare a canvas and keep it level for acrylic pouring?
Clean the canvas with a lint-free, slightly damp cloth, then prime it to help paint move across the surface. Let the prepared surface dry before pouring. Set the canvas on a firm, level support, and check that its corners sit evenly rather than rocking. A tilted surface can draw paint towards one edge, so correct the support before mixing or applying paint.


Comments